How to Start a Campfire: A Step-by-Step Guide for Beginners
Picture this: the sun has just set behind the trees, a gentle breeze carries the scent of pine, and you’re surrounded by friends and family at your campsite. The only thing missing? A warm, crackling campfire to complete the perfect camping experience. Yet for many beginners, knowing how to start a fire at a campsite can feel intimidating. Whether you’re planning your first outdoor adventure or simply want to master this essential camping skill, this comprehensive guide will transform you from a nervous novice into a confident fire-starter.
Key Takeaways
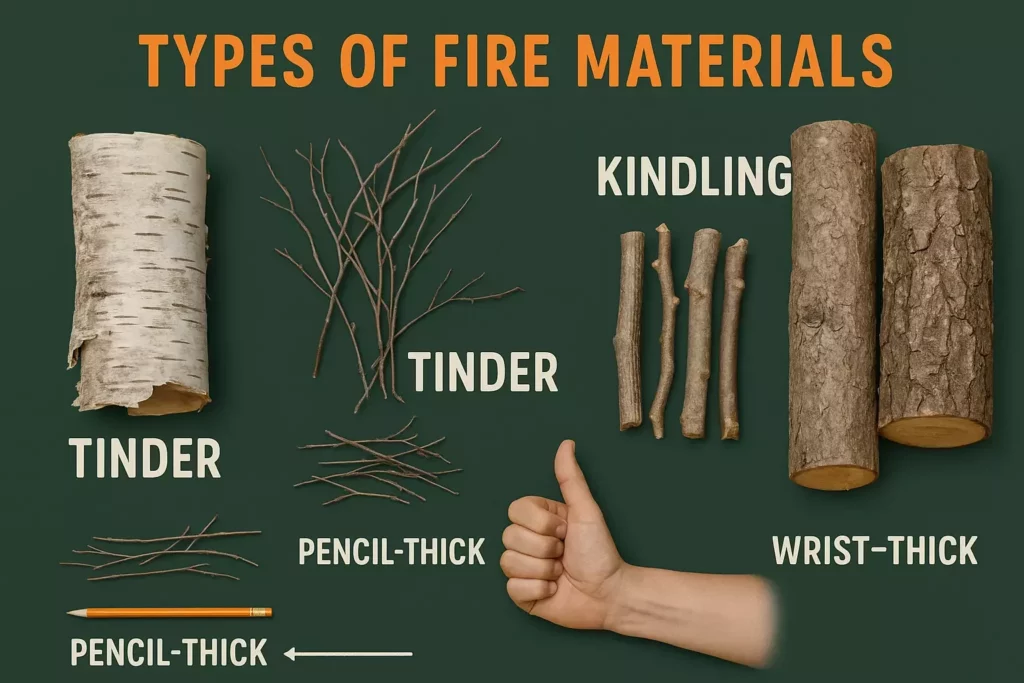
- Gather three types of materials: tinder (pencil-thin), kindling (thumb-thick), and fuel wood (wrist-thick and larger)
- Choose the right location: Use designated fire rings when available, or create a safe fire area away from flammable materials
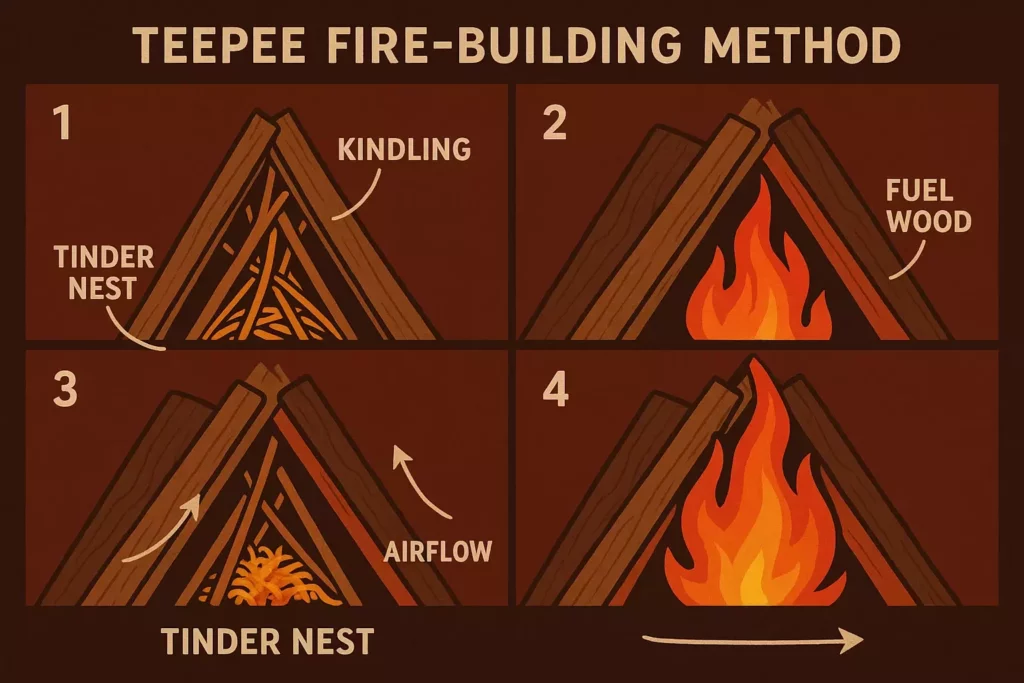
- Master the teepee structure: Build your fire in a cone shape for optimal airflow and flame progression
- Safety comes first: Always have water nearby and follow Leave No Trace principles
- Practice makes perfect: Start with quality camping starters like dry bark or commercial fire starters to increase your success rate
Understanding Fire Basics: The Fire Triangle 🔥
Before diving into the practical steps of how to start a fire at a campsite, it’s crucial to understand the science behind fire. Every successful campfire relies on three essential elements known as the fire triangle:
Heat provides the initial energy to ignite materials. This comes from your ignition source, whether it’s matches, a lighter, or flint and steel.
Fuel consists of combustible materials that feed the fire. This includes everything from tinder to large logs.
Oxygen enables the chemical reaction of combustion. Proper airflow is why fire-building techniques focus on structure and spacing.
Remove any one of these elements, and your fire will fail to start or quickly die out. Understanding this principle will help you troubleshoot problems and build better fires consistently.
Essential Fire-Starting Materials and Tools
Tinder: Your Fire’s Foundation
Tinder consists of fine, dry materials that catch fire easily from a small spark or flame. The best tinder materials are:
- Birch bark – Nature’s paper that burns even when damp
- Dry grass and pine needles – Abundant in most camping areas
- Paper and cardboard – Reliable backup options
- Commercial fire starters – Excellent camping starters for beginners
- Fatwood – Resin-rich pine wood that ignites quickly
Kindling: Building the Flame
Kindling bridges the gap between tinder and larger fuel wood. Look for:
- Pencil-thick to thumb-thick dry twigs
- Split softwood pieces
- Dry bamboo or cedar strips
- Small pieces of fatwood
Fuel Wood: Sustaining Your Fire
Fuel wood keeps your fire burning strong throughout the evening:
- Hardwoods (oak, maple, hickory) – Burn longer and hotter
- Softwoods (pine, fir, cedar) – Ignite easier but burn faster
- Various sizes from thumb-thick to forearm-thick pieces
Pro Tip: Collect more materials than you think you’ll need. It’s better to have extra than to search for fuel wood in the dark!
Essential Tools
- Waterproof matches or reliable lighter
- Fire steel and striker (backup ignition)
- Small hatchet or saw for processing wood
- Work gloves for handling materials safely
- Water bucket or shovel for fire safety
Choosing the Perfect Fire Location
Using Established Fire Rings
Most developed campgrounds provide designated fire rings or fire pits. These locations offer several advantages:
- Pre-cleared areas with minimal fire risk
- Proper drainage and wind considerations
- Compliance with campground regulations
- Reduced environmental impact
When using established fire rings, clear any debris from inside the ring and check for damage that might affect safety.
Creating Your Own Fire Site
In backcountry camping situations where fires are permitted, follow these guidelines:
Location Requirements:
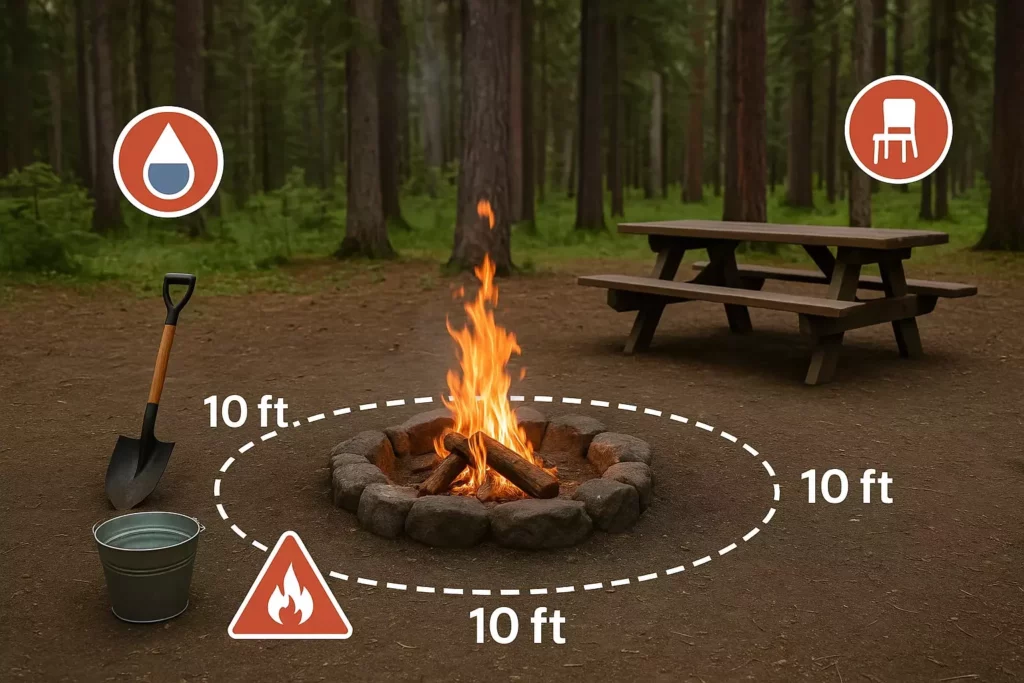
- 15 feet minimum from tents, trees, and flammable materials
- Level ground with good drainage
- Natural windbreak protection when possible
- Easy access to water for emergencies
Site Preparation:
- Clear a 10-foot diameter circle down to bare soil
- Remove all flammable materials including leaves, grass, and twigs
- Dig a shallow depression 6-8 inches deep
- Create a ring with rocks (avoid river rocks that may explode when heated)
For comprehensive camping setup guidance, including fire safety considerations, check out our complete campsite setup guide.
Step-by-Step Fire Building Process
Step 1: Prepare Your Materials
Before striking a match, organize your materials by size:
- Tinder bundle – Enough fine material to fill both hands
- Kindling pile – 15-20 pieces ranging from pencil to thumb thickness
- Small fuel wood – 10-15 pieces from thumb to wrist thickness
- Larger fuel wood – 5-10 pieces for sustained burning
Material Testing: Dry wood snaps cleanly when broken, while wet wood bends or makes a dull thud. Test your materials before building your fire structure.
Step 2: Build the Foundation
Create a platform for your fire using:
- Two parallel logs or several thick sticks
- Flat rocks (if available and safe)
- This elevates your tinder bundle, improving airflow
Step 3: Construct the Tinder Nest
Form your finest tinder into a bird’s nest shape:
- Create a depression in the center
- Ensure loose, airy construction for oxygen flow
- Place this nest on your foundation platform
Step 4: Create the Teepee Structure
The teepee method is the most reliable technique for beginners:
- Place kindling around the tinder nest in a cone shape
- Leave gaps between pieces for airflow
- Start small with pencil-thick pieces closest to the tinder
- Graduate sizes outward, ending with thumb-thick pieces
- Create a door – leave one side slightly more open for lighting access
Step 5: Light the Fire
Lighting technique:
- Light the tinder from the “door” side of your teepee
- Blow gently at the base to provide oxygen
- Watch for flame spread from tinder to kindling
- Add progressively larger kindling as flames grow
Troubleshooting: If the fire struggles, check for adequate airflow and ensure your materials are dry enough.
Step 6: Feed and Maintain
As your teepee burns and collapses:
- Add fuel wood gradually – never smother the flames
- Maintain the teepee structure as long as possible
- Transition to log cabin style for cooking fires
- Keep a steady supply of fuel wood nearby
Alternative Fire-Starting Methods
The Log Cabin Method
Best for: Cooking fires and long-burning warmth
Construction:
- Place two logs parallel, 6 inches apart
- Stack two more logs perpendicular on top
- Continue alternating directions
- Fill the center with tinder and kindling
- Light from the top center
The Lean-To Method
Best for: Windy conditions
Construction:
- Place a large log as a windbreak
- Lean kindling against the log
- Place tinder underneath the kindling lean-to
- Light the tinder and let flames travel up
Using Commercial Fire Starters
Quality camping starters can significantly improve success rates:
- Wax-soaked wood shavings – Burn for 8-10 minutes
- Fire starter cubes – Waterproof and reliable
- Petroleum jelly cotton balls – Homemade option that works well
- Dryer lint in egg cartons – Budget-friendly alternative
Fire Safety and Regulations
Essential Safety Practices
Before Lighting:
- Check local fire restrictions and regulations
- Verify weather conditions – avoid high wind days
- Prepare emergency water supply (5+ gallons recommended)
- Clear the area of all flammable materials
During Use:
- Never leave unattended – even for short periods
- Keep fires manageable – no higher than 3 feet
- Supervise children closely around fire areas
- Have safety tools ready – water, shovel, dirt
Extinguishing Properly:
- Allow wood to burn completely to ash when possible
- Pour water slowly over all embers and coals
- Stir ashes and embers with a shovel
- Add more water and stir again
- Feel for heat with the back of your hand before leaving
Leave No Trace Principles
Minimize fire impacts by following these guidelines:
- Use established fire rings when available
- Keep fires small and manageable
- Burn only dead and downed wood
- Never cut live trees or branches
- Scatter cold ashes over a wide area
- Pack out any unburned materials
Having a well-stocked first aid kit is essential for treating minor burns or injuries around the campfire.
Troubleshooting Common Problems
Fire Won’t Start
Possible causes and solutions:
- Wet materials → Find drier tinder or use commercial fire starters
- Poor airflow → Rebuild with more gaps between materials
- Wrong material sizes → Start with finer tinder and smaller kindling
- Insufficient heat source → Use multiple matches or a better lighter
Fire Dies Quickly
Common issues:
- Adding fuel too quickly → Let each addition catch before adding more
- Fuel too large → Use smaller pieces to build up heat gradually
- Poor structure → Maintain teepee shape longer for better airflow
- Damp conditions → Create a roof with bark or tarp to protect flames
Smoky Fire
Causes and fixes:
- Wet or green wood → Use only dry, seasoned wood
- Poor ventilation → Adjust log placement for better airflow
- Wind direction → Reposition seating or create windbreaks
🔥 Campfire Wood Calculator
💡 Pro Tips:
Advanced Techniques for Challenging Conditions
Starting Fires in Wet Weather
Wet weather strategies:
- Find dry materials under dense tree cover or overhangs
- Split wet logs to access dry interior wood
- Use birch bark – burns even when damp due to natural oils
- Create a dry platform with rocks or green logs
- Build a tinder roof using bark or a small tarp
Cold Weather Considerations
Winter fire challenges:
- Clear snow down to ground level in a wide area
- Create a platform of green logs to prevent melting into snow
- Use extra tinder as cold materials require more heat
- Pre-warm matches in your pocket before use
- Build larger fires for adequate heat output
High Altitude Adjustments
Thin air considerations:
- Allow extra time for materials to ignite
- Use more tinder to compensate for reduced oxygen
- Build looser structures for maximum airflow
- Expect faster burning once fires are established
Cooking and Practical Uses
Transitioning to Cooking Fires
Once your fire is established, modify it for cooking:
For direct grilling:
- Let flames die down to hot coals
- Spread coals evenly under cooking area
- Maintain consistent heat with small fuel additions
For pot cooking:
- Build up one side higher for adjustable heat zones
- Use rocks to create pot stands
- Keep a supply of small fuel wood for heat control
For detailed campfire cooking techniques and meal ideas, explore our guide on campfire cooking for breakfast meals.
Other Practical Fire Uses
Warmth and comfort:
- Position seating to maximize heat reflection
- Build reflector walls with logs or rocks
- Maintain steady, moderate-sized fires for efficiency
Light and safety:
- Keep fires burning during evening activities
- Use as a gathering point for group activities
- Provide security lighting around camp
Emergency signaling:
- Create smoke signals with green vegetation
- Build signal fires on high, visible locations
- Maintain emergency fire materials in survival kits
For comprehensive survival preparedness, consider building a complete bushcraft survival kit that includes fire-starting materials.
Environmental Considerations and Ethics
Sustainable Wood Collection
Responsible gathering practices:
- Use only dead and downed wood – never cut living trees
- Collect from the ground rather than breaking branches
- Vary collection areas to minimize impact
- Leave some dead wood for wildlife habitat
Minimizing Environmental Impact
Low-impact techniques:
- Use existing fire rings whenever possible
- Keep fires small – they’re easier to manage and less impactful
- Burn wood completely to minimize waste
- Restore fire sites in pristine areas before leaving
Protecting Wildlife
Wildlife considerations:
- Store food properly – fires attract animals to cooking smells
- Avoid fires during high fire danger periods
- Respect seasonal restrictions that protect nesting wildlife
- Choose locations away from water sources animals depend on
Planning Your Fire Strategy
Pre-Trip Preparation
Before leaving home:
- Research fire regulations for your destination
- Check weather conditions and fire danger levels
- Pack quality fire starters and waterproof matches
- Include fire tools in your camping gear checklist
Weather Monitoring
Daily fire decisions:
- Check wind conditions – avoid fires in high winds
- Monitor humidity levels – dry conditions increase fire danger
- Watch for weather changes that might affect fire safety
- Have backup plans for fire restrictions or poor conditions
Group Coordination
When camping with others:
- Assign fire responsibilities to experienced members
- Teach fire safety to all group members
- Establish clear rules for children around fires
- Plan supervision schedules for extended fire use
This is especially important when camping with kids, where extra safety measures and supervision are essential.
Building Confidence Through Practice
Starting at Home
Safe practice opportunities:
- Backyard fire pits provide controlled learning environments
- Practice material identification during nature walks
- Try different fire-starting methods in safe settings
- Experiment with commercial fire starters to find preferences
Skill Progression
Building expertise gradually:
- Master basic techniques before attempting advanced methods
- Practice in good weather before challenging conditions
- Learn from experienced campers and outdoor educators
- Keep detailed notes about what works in different situations
Emergency Preparedness
Developing survival skills:
- Practice primitive fire methods like bow drill or flint and steel
- Learn to identify natural tinder in various environments
- Practice fire starting with minimal tools
- Understand fire’s role in emergency survival situations
Seasonal Fire Considerations
Spring Camping Fires
Spring challenges and opportunities:
- Wet conditions from snowmelt and spring rains
- Abundant dry materials from winter debris
- Variable weather requiring flexible fire strategies
- Fire restrictions may begin in some areas
Summer Fire Management
Hot weather considerations:
- High fire danger periods require extra caution
- Dry conditions make ignition easier but spread more dangerous
- Heat management – smaller fires for comfort
- Water scarcity – plan extra water for fire safety
Fall Fire Enjoyment
Autumn advantages:
- Ideal conditions with moderate humidity and temperatures
- Abundant fuel from fallen leaves and branches
- Comfortable weather for extended fire enjoyment
- Longer nights increase fire appreciation
Winter Fire Challenges
Cold weather strategies:
- Snow and ice create unique challenges
- Limited daylight for material collection
- Increased heat needs require larger, longer-burning fires
- Special techniques for snow and cold conditions
When preparing for cold weather camping, proper clothing selection is just as important as fire-building skills.
Conclusion
Mastering how to start a fire at a campsite is one of the most rewarding and practical skills any outdoor enthusiast can develop. From understanding the basic fire triangle to implementing advanced techniques for challenging conditions, this comprehensive guide provides the foundation for safe, successful fire building in any camping situation.
Remember that becoming proficient with camping starters and fire-building techniques takes practice. Start with simple methods in controlled environments, gradually building your skills and confidence. Always prioritize safety by following local regulations, maintaining proper fire management practices, and respecting the natural environment.
Your next steps:
- Practice at home in a safe fire pit or controlled environment
- Gather quality materials including reliable fire starters and tools
- Start with established campgrounds that provide fire rings and safety infrastructure
- Build your skills gradually before attempting fires in challenging conditions
- Always prioritize safety and environmental responsibility
Whether you’re planning a family camping trip, a solo wilderness adventure, or building emergency preparedness skills, the ability to create and maintain a campfire will enhance your outdoor experiences and provide confidence in any situation. Take the time to practice these techniques, respect the power of fire, and enjoy the warmth, light, and community that a well-built campfire brings to any camping adventure.
For those planning their first camping experience, consider reviewing our family camping activities guide to make the most of your campfire as a centerpiece for memorable outdoor experiences.