How to Pack Your Backpack for Camping: The Complete Guide to Efficient Outdoor Packing
Picture this: you’re standing at the trailhead, excited for your weekend camping adventure, when you realize your backpack feels like you’re carrying a small refrigerator. Meanwhile, the experienced hiker next to you effortlessly shoulders their pack and heads down the trail with a spring in their step. The difference? Proper packing technique.

Learning how to pack your backpack correctly isn’t just about comfort—it’s about safety, efficiency, and enjoying your outdoor experience to the fullest. A well-packed backpack can mean the difference between a memorable adventure and a painful struggle through the wilderness.
Key Takeaways
- Weight distribution is crucial – Heavy items should go close to your back in the middle third of the pack
- Pack in reverse order – Items you need first should be packed last and easily accessible
- Use compression and organization – Stuff sacks and compression straps help maximize space and keep gear organized
- Balance comfort with accessibility – Essential items like first aid and rain gear need quick access without major unpacking
- Practice at home first – Test your packing system before heading into the wilderness
Understanding Backpack Anatomy and Capacity
Before diving into packing techniques, it’s essential to understand your backpack’s design and capacity. Modern camping backpacks typically range from 30-80 liters, with most weekend camping trips requiring 40-60 liters of space.
Backpack Zones and Their Purpose
Your backpack has distinct zones that serve different functions:
🎯 Top Compartment (Brain/Lid)
- Quick-access items like snacks, maps, and headlamps
- Usually 5-10 liters of additional storage
🎯 Main Compartment
- Bulk items like clothing, sleeping bag, and food
- The largest storage area of your pack
🎯 Bottom Compartment
- Sleeping bag and other lightweight, bulky items
- Often features a separate zipper for easy access
🎯 Side Pockets
- Water bottles, fuel canisters, and frequently used items
- External attachment points for gear
The Golden Rules of Backpack Packing
Rule #1: The 10% Weight Rule
Your fully loaded backpack should never exceed 10-20% of your body weight. For a 150-pound person, this means a maximum pack weight of 15-30 pounds, including water and food.
Rule #2: Heavy Items Go Center-Back
Place the heaviest items (like water, food, and cooking gear) close to your back in the middle third of the pack. This positioning:
- Keeps weight close to your center of gravity
- Reduces strain on your shoulders and back
- Improves balance on uneven terrain
Rule #3: Accessibility Hierarchy
Pack items based on when you’ll need them:
- Immediate access: Rain gear, snacks, map, first aid
- Camp setup: Tent, sleeping system, cooking gear
- Rarely needed: Extra clothes, backup equipment
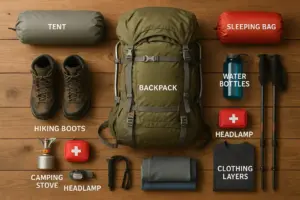
Essential Gear Categories and Packing Priority

🏕️ Shelter and Sleep System (Bottom Third)
Your sleeping bag and tent typically go in the bottom compartment or bottom of the main compartment. These items are:
- Lightweight but bulky
- Only needed at camp
- Benefit from compression
Pro Tip: Use a compression sack for your sleeping bag to reduce its packed size by up to 40%.
🍽️ Food and Water (Middle Third – Close to Back)
Food and water are your heaviest items and should be packed strategically:
- Water: Close to your back, middle height
- Heavy food items: Canned goods, dense foods near the center
- Light snacks: Top compartment for easy access
“The key to comfortable backpacking is keeping heavy items as close to your back as possible while maintaining easy access to essentials.” – Experienced Backpacker
👕 Clothing and Personal Items (Fill Gaps)
Weather-appropriate clothing should fill gaps around heavier items:
- Rain gear: Top or external pocket for quick access
- Extra clothes: Stuff sacks work well for compression
- Underwear and socks: Fill small gaps efficiently
🔧 Cooking and Safety Gear (Middle Third)
Cooking equipment and your first aid kit require strategic placement:
- Stove and fuel: Secure and accessible
- Cookware: Nest items to save space
- First aid: External pocket or top compartment
Step-by-Step Packing Process
Step 1: Lay Out All Gear
Before packing, spread all your gear on the ground and organize by category. This helps you:
- Ensure you have everything needed
- Identify items to leave behind
- Plan your packing strategy
Step 2: Start with the Sleeping Bag
Place your compressed sleeping bag in the bottom compartment. If your pack doesn’t have a bottom compartment, put it at the very bottom of the main compartment.
Step 3: Add the Tent
Your tent can go:
- Packed: Inside the main compartment if space allows
- External: Strapped to the outside if internal space is limited
For family camping or larger tents like an Ozark 8-person tent, consider distributing tent components among multiple packs.
Step 4: Load Heavy Items
Place water, food, and cooking gear in the middle third of your pack, close to your back:
| Item Category | Ideal Placement | Weight Distribution |
|---|---|---|
| Water reservoirs | Against back panel | 25-30% of pack weight |
| Dense food items | Center, mid-height | 20-25% of pack weight |
| Cooking gear | Accessible but secure | 10-15% of pack weight |
Step 5: Fill with Clothing and Soft Items
Use clothing and soft items to fill gaps and provide cushioning around hard objects. Stuff sacks are invaluable for:
- Organizing similar items
- Compressing bulky clothing
- Keeping gear dry
Step 6: Top Loading Strategy
The top of your pack should contain:
- Items needed during the hike (snacks, map, sunscreen)
- Rain gear for weather changes
- First aid supplies for emergencies
Advanced Packing Techniques
🎒 Compression and Space Optimization
Compression Straps: Use your pack’s compression straps to:
- Reduce pack volume
- Stabilize the load
- Prevent gear from shifting
Stuff vs. Fold:
- Stuff: Sleeping bags, down jackets, and compressible items
- Fold: Technical clothing, rain gear, and items prone to wrinkles
🎒 External Attachment Points
Most backpacks feature external attachment points for:
- Trekking poles: Side compression straps or dedicated loops
- Water bottles: Side pockets or external holders
- Wet gear: Outside attachment when items are too wet for internal storage
🎒 Weight Distribution for Different Terrains
Flat Terrain: Weight can be slightly higher for easier walking
Steep/Technical Terrain: Keep weight lower and closer to your back for better balance
Common Packing Mistakes to Avoid

❌ Overpacking
The biggest mistake new campers make is bringing too much gear. Stick to essentials and learn to identify “nice-to-have” vs. “need-to-have” items.
❌ Poor Weight Distribution
Avoid these weight distribution errors:
- Heavy items at the top (creates instability)
- Heavy items away from your back (increases strain)
- Uneven side-to-side weight distribution
❌ Inaccessible Emergency Gear
Your first aid kit, rain gear, and emergency supplies should never be buried at the bottom of your pack.
❌ Neglecting Pack Fit
Even perfect packing won’t help if your pack doesn’t fit properly:
- Adjust shoulder straps for comfort
- Use hip belt to transfer weight to your hips
- Ensure load lifters prevent the pack from pulling backward
Specialized Packing Considerations
🌧️ Weather-Specific Packing
Wet Weather Preparation:
- Pack everything in waterproof stuff sacks
- Keep rain gear easily accessible
- Consider pack covers for additional protection
Cold Weather Considerations:
- Appropriate cold weather clothing takes more space
- Insulation items compress well but need room to loft
- Keep batteries warm in internal pockets
👨👩👧👦 Family Camping Adaptations
When camping with kids, packing strategies change:
- Adults carry heavier items
- Kids can carry their own age-appropriate gear
- Emergency supplies should be distributed among adult packs
🏕️ Multi-Day vs. Weekend Trips
Weekend Trips (1-3 days):
- Smaller packs (30-50 liters)
- Less food and fewer clothing changes
- Can sacrifice some weight for convenience items
Multi-Day Expeditions:
- Larger packs (50-80 liters)
- More food and clothing
- Weight becomes more critical
- Consider water purification systems instead of carrying all water
Pack Maintenance and Organization
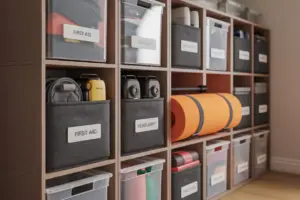
🧹 Keeping Your Pack Organized
Color-Coded Stuff Sacks: Use different colored stuff sacks for different categories:
- Red: Emergency and first aid
- Blue: Clothing
- Green: Food and cooking
- Yellow: Electronics and tools
Packing Lists: Maintain a master packing list and check items off as you pack. This prevents forgotten essentials and helps with post-trip organization.
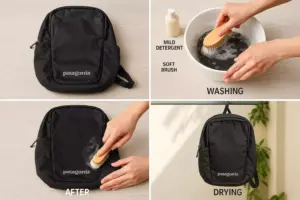
🧹 Pack Care and Maintenance
Cleaning:
- Empty and air out your pack after each trip
- Spot clean with mild soap and water
- Allow to dry completely before storage
Storage:
- Store with zippers open to prevent mildew
- Keep in a cool, dry place
- Check for wear and tear regularly
Technology and Modern Packing Aids

📱 Digital Tools
Packing Apps: Several smartphone apps can help you:
- Create and manage packing lists
- Track gear weight
- Plan meals and calculate food needs
Weight Scales: A small digital scale helps you:
- Monitor total pack weight
- Identify heavy items to leave behind
- Distribute weight evenly among group members
📱 GPS and Navigation
Modern navigation tools affect packing:
- GPS devices: Reduce need for extensive paper maps
- Smartphone apps: Can replace multiple navigation tools
- Backup power: Portable chargers become essential
Building Your Packing Skills
🎯 Practice at Home
Before your trip:
- Pack your backpack completely
- Wear it around the house or neighborhood
- Time how long it takes to find specific items
- Adjust organization based on what works
🎯 Start Small
Begin with:
- Day hikes to test your system
- Overnight trips close to home
- Gradually increase trip length and remoteness
🎯 Learn from Experience
After each trip:
- Note what you didn’t use
- Identify items that were hard to access
- Adjust your packing list and strategy
🎒 Interactive Backpack Weight Calculator & Packing Planner
💡 Packing Tips
- Heavy items should go in the middle third of your pack, close to your back
- Pack items you’ll need first on top or in easily accessible pockets
- Use compression sacks to reduce bulk of sleeping bags and clothing
Conclusion
Mastering the art of backpack packing transforms your camping experience from a burden into pure adventure. Remember that proper weight distribution, strategic organization, and accessibility are the three pillars of effective packing.
Start with the fundamentals: keep heavy items close to your back in the middle third of your pack, organize gear by frequency of use, and never exceed 20% of your body weight. Practice these techniques at home before hitting the trail, and don’t be afraid to adjust your system based on experience.
Your Next Steps:
- Assess your current gear – weigh everything and identify heavy items that could be replaced with lighter alternatives
- Practice packing – set up your system at home and time how quickly you can access essential items
- Start small – test your packing strategy on day hikes before committing to longer adventures
- Keep refining – maintain a packing list and notes about what works and what doesn’t
Whether you’re planning a weekend getaway or preparing for bushcraft survival adventures, the principles in this guide will serve you well. Remember, the best packing system is the one that works consistently for you and enhances your outdoor experience.
Ready to put these skills to the test? Start planning your next camping adventure, and don’t forget to share your packing tips with fellow outdoor enthusiasts. The wilderness is waiting! 🏔️