The Classic Campfire Percolator: How to Make the Perfect Pot of Camp Coffee
Picture this: you wake up in your tent to the sound of birds chirping and fresh mountain air filling your lungs. But there’s one thing missing from this perfect morning – that rich, aromatic cup of coffee that transforms you from a groggy camper into a happy outdoor adventurer. While instant coffee might seem like the easy solution, nothing beats the bold, satisfying taste of coffee brewed the traditional way using a classic campfire percolator.

Learning how to make coffee when you’re camping with a pot percolator is an essential skill that every outdoor enthusiast should master. This time-tested brewing method has been fueling camping adventures for generations, delivering consistently delicious results that will make your morning routine something to look forward to, no matter how remote your campsite.
Key Takeaways
- Percolator coffee brewing creates rich, full-bodied coffee perfect for outdoor adventures
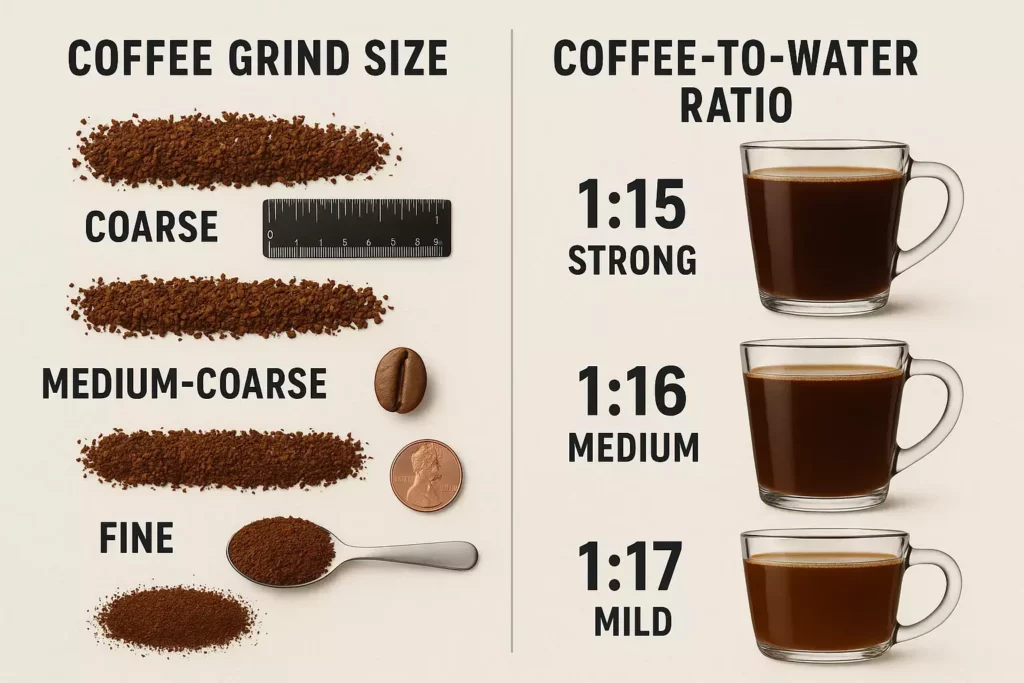
- Proper water-to-coffee ratio (1:15 to 1:17) ensures optimal flavor extraction
- Medium-coarse grind prevents over-extraction and bitter taste
- Temperature control and timing (8-10 minutes) are crucial for perfect results
- Quality equipment and proper maintenance extend your percolator’s lifespan
What Makes Percolator Coffee Special for Camping? ☕
The campfire percolator represents the gold standard of outdoor coffee brewing. Unlike modern drip machines or single-serve pods, this method relies on the simple physics of boiling water cycling through coffee grounds repeatedly. This process creates a robust, full-bodied coffee that stands up to the hearty meals and active lifestyle of camping.
Why choose a percolator over other camping coffee methods?
- Durability: Built to withstand outdoor conditions
- Capacity: Brews multiple cups at once for groups
- Flavor: Creates rich, strong coffee that cuts through morning grogginess
- Simplicity: No filters or complex equipment needed
- Tradition: Connects you to generations of outdoor coffee culture
The percolation process works by heating water in the bottom chamber, which then travels up through a central tube and spreads over the coffee grounds in a basket. As gravity pulls the water back down, it extracts oils and flavors, creating that distinctive percolated taste.
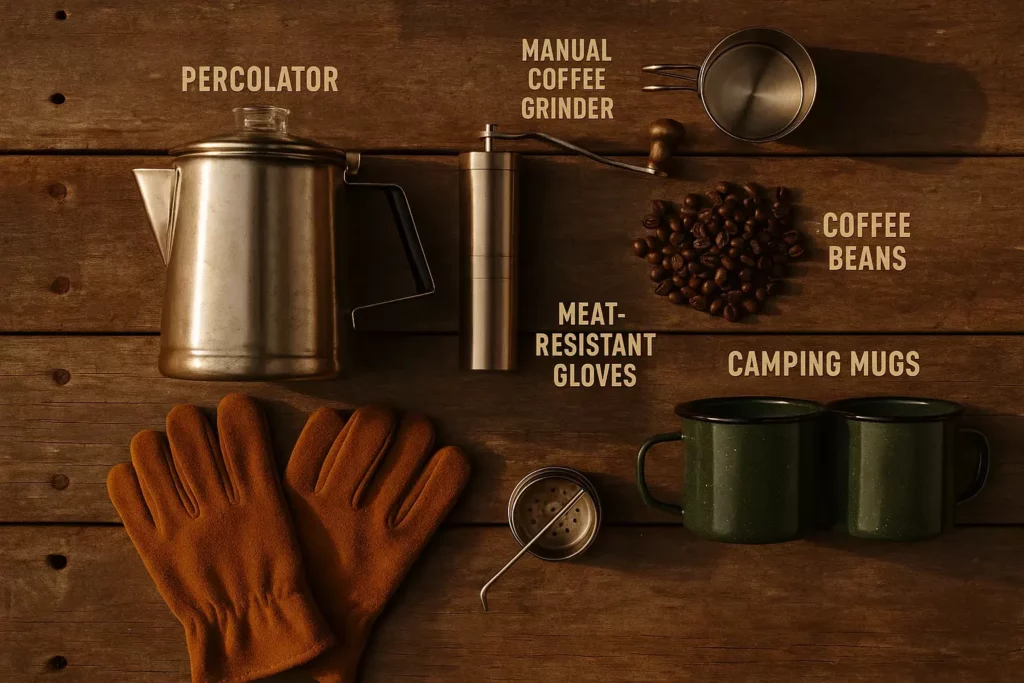
Essential Equipment for Campfire Coffee Brewing
Choosing the Right Percolator
Not all percolators are created equal, especially for camping use. When selecting your pot percolator, consider these key features:
Material Options:
- Stainless Steel: Durable, rust-resistant, retains heat well
- Aluminum: Lightweight, heats quickly, budget-friendly
- Enamelware: Classic look, even heating, easy to clean
Size Considerations:
- 2-4 cups: Perfect for solo camping or couples
- 6-8 cups: Ideal for small families or groups
- 9+ cups: Best for large camping parties
Additional Equipment You’ll Need
| Item | Purpose | Pro Tip |
|---|---|---|
| Heat-resistant gloves | Safe handling of hot percolator | Essential for preventing burns |
| Long-handled spoon | Stirring and serving | Keeps hands away from heat |
| Coffee grinder | Fresh ground coffee | Manual grinders work without power |
| Measuring cup | Accurate water/coffee ratios | Collapsible versions save space |
| Timer | Monitoring brew time | Smartphone or watch works fine |
Having the right camping gear setup makes all the difference in your outdoor coffee experience.
Coffee Selection and Preparation
Choosing the Perfect Coffee Beans
The foundation of excellent camp coffee starts with quality beans. While you might be tempted to use cheap coffee for camping, remember that you’ll taste every flaw more intensely in percolated coffee.
Best Coffee Types for Percolating:
- Medium to Dark Roasts: Handle the intense brewing process well
- Single Origin: Offers consistent flavor profiles
- Blends: Provide balanced, approachable taste
Avoid These Coffee Types:
- Very light roasts (can taste sour when percolated)
- Flavored coffees (artificial flavors may become overwhelming)
- Pre-ground coffee older than two weeks
The Critical Importance of Grind Size
Getting the grind size right is absolutely crucial when learning how to make coffee when you’re camping with a pot percolator. The wrong grind can ruin an otherwise perfect brewing process.
Optimal Grind: Medium-Coarse
- Similar to coarse sea salt
- Allows proper water flow
- Prevents over-extraction
- Reduces sediment in final cup
Grinding Tips for Camping:
- Grind beans at home and store in airtight containers
- Bring a manual grinder for ultra-fresh coffee
- Pre-measure portions for easy morning brewing
Step-by-Step Percolator Brewing Guide
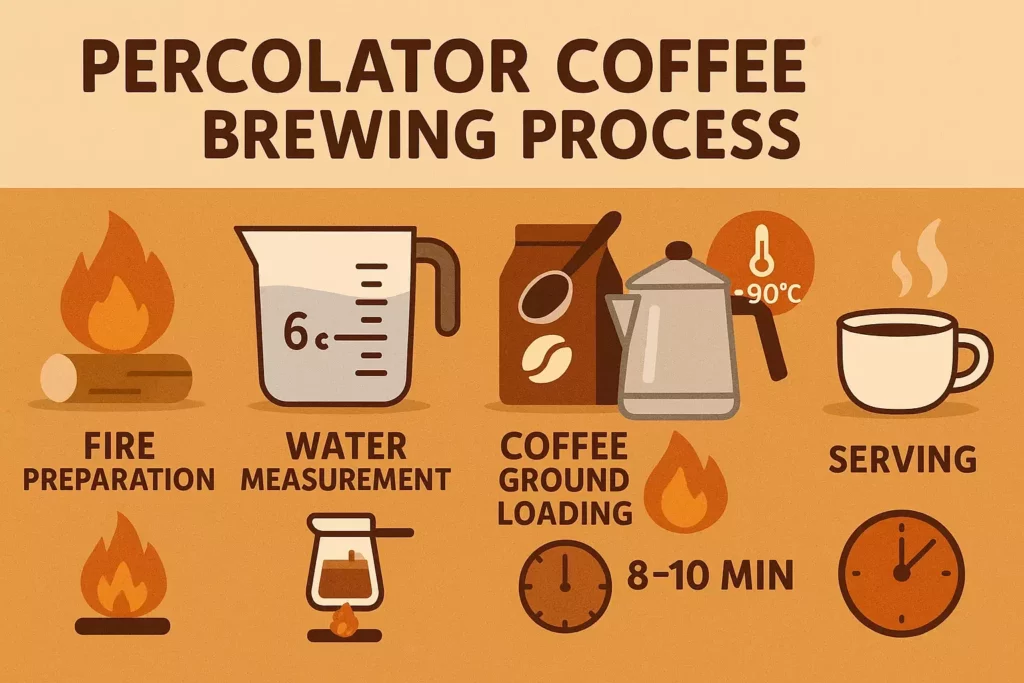
Step 1: Fire Preparation and Safety
Before you even touch your coffee equipment, ensure you have a proper campfire setup. Safety should always be your top priority when combining hot liquids with open flames.
Fire Safety Essentials:
- Clear area of flammable materials
- Have water nearby for emergencies
- Use established fire rings when available
- Never leave fire unattended
Consider keeping a well-stocked first aid kit nearby when working with hot equipment and open flames.
Step 2: Water Preparation
Start with cold, clean water for the best-tasting coffee. If you’re camping in an area where water quality is questionable, make sure you know how to purify water properly before brewing.
Water Guidelines:
- Use 6 ounces of water per cup of coffee desired
- Fill percolator to just below the basket level
- Never overfill – this prevents proper percolation
Step 3: Coffee Measurement and Loading
The coffee-to-water ratio makes or breaks your camp coffee experience. Too little coffee results in weak, disappointing brew, while too much creates bitter, undrinkable sludge.
Perfect Ratio Formula:
- 1:15 to 1:17 ratio (coffee to water)
- 1 tablespoon of coffee per 6 ounces of water
- Adjust to taste preference
Loading the Basket:
- Remove the basket and stem assembly
- Add measured coffee grounds to basket
- Level grounds gently – don’t pack down
- Reassemble percolator carefully
Step 4: Heat Management and Timing
This step separates amateur camp coffee from barista-quality results. Temperature control is everything when using a percolator over an open fire.
Heat Management Process:
- Initial heating: Place percolator over medium heat
- Watch for percolation: Look for coffee appearing in glass knob
- Reduce heat: Lower temperature once percolation begins
- Maintain gentle bubbling: Avoid vigorous boiling
Timing Guidelines:
- Total brew time: 8-10 minutes
- Gentle percolation: 6-8 minutes
- Strength adjustment: Longer brewing = stronger coffee
Pro Tip: “The secret to perfect percolator coffee is patience and gentle heat. Let the process work slowly, and you’ll be rewarded with rich, smooth coffee that rivals any coffee shop.” – Experienced Camp Cook
Step 5: Serving and Enjoyment
Once your coffee has finished brewing, remove it from heat immediately to prevent over-extraction. The percolation process continues as long as the coffee stays hot, so timing your removal is crucial.
Serving Best Practices:
- Let coffee settle for 1-2 minutes before pouring
- Pour slowly to minimize sediment
- Serve immediately for best taste
- Keep remaining coffee warm off direct heat
Calculate perfect coffee-to-water ratios for your percolator
• Use medium-coarse grind for best results
• Start with medium heat, reduce when percolation begins
• Remove from heat immediately when brewing is complete
• Let settle 1-2 minutes before serving
Common Mistakes and How to Avoid Them
Mistake #1: Wrong Grind Size
The Problem: Using fine or extra-fine coffee grounds leads to over-extraction and bitter, muddy coffee.
The Solution: Always use medium-coarse grind – think coarse sea salt texture. If you only have pre-ground coffee, look for brands specifically labeled for percolators or French press.
Mistake #2: Excessive Heat
The Problem: Keeping the percolator over high heat throughout the brewing process creates burnt, bitter coffee.
The Solution: Start with medium heat to initiate percolation, then reduce to low heat to maintain gentle bubbling. The coffee should percolate slowly and steadily, not violently boil.
Mistake #3: Incorrect Ratios
The Problem: Guessing at coffee and water measurements results in inconsistent, often disappointing results.
The Solution: Always measure both coffee and water. Start with the 1:16 ratio (1 gram coffee to 16 grams water) and adjust to taste preferences.
Mistake #4: Over-Brewing
The Problem: Leaving the percolator on heat too long or allowing extended percolation creates overly strong, bitter coffee.
The Solution: Time your brewing carefully – 8-10 minutes total, with 6-8 minutes of active percolation. Remove from heat immediately when done.
Advanced Tips for Perfect Camp Coffee
Altitude Adjustments
Camping at higher elevations requires modifications to your brewing technique. Water boils at lower temperatures at altitude, affecting extraction.
High Altitude Brewing Tips:
- Increase brewing time by 1-2 minutes
- Use slightly more coffee grounds
- Monitor percolation more carefully
- Expect different flavor profiles
Weather Considerations
Cold Weather Brewing:
- Preheat your percolator with warm water
- Use extra insulation around the pot
- Account for longer heating times
- Keep coffee warm with camp-safe methods
Windy Conditions:
- Create windbreaks around your fire
- Use lower, more stable heat sources
- Consider alternative brewing locations
When camping with kids, establishing a safe coffee brewing routine becomes even more important.
Water Quality Impact
The quality of your water dramatically affects your final coffee taste. Poor water quality can ruin even the best coffee beans and perfect technique.
Water Quality Solutions:
- Use filtered or bottled water when possible
- Learn proper water purification techniques
- Avoid water with strong mineral tastes
- Let treated water settle before brewing
Maintenance and Care of Your Percolator
Daily Cleaning Routine
Proper maintenance extends your percolator’s life and ensures consistently great-tasting coffee. Never let coffee residue build up inside your percolator.
After Each Use:
- Rinse with hot water immediately after use
- Disassemble all removable parts
- Scrub gently with camp-safe soap
- Rinse thoroughly and air dry completely
Deep Cleaning Methods
Weekly Deep Clean (During Extended Trips):
- Fill with water and 2 tablespoons of baking soda
- Percolate the solution for 5 minutes
- Let sit for 30 minutes
- Rinse thoroughly multiple times
Removing Stubborn Stains:
- Use white vinegar and water solution (1:1 ratio)
- Percolate for one cycle
- Rinse extensively to remove vinegar taste
Storage and Transport
Proper Storage Prevents Damage:
- Ensure completely dry before packing
- Store with basket and stem separated
- Use protective padding in your camping gear
- Check for dents or damage before each trip
Alternative Campfire Coffee Methods
While percolators excel at making great camp coffee, understanding other methods helps you adapt to different situations and preferences.
Cowboy Coffee
The Method: Boiling coffee grounds directly in water
Pros: Minimal equipment needed
Cons: Sediment in final cup, difficult to control strength
French Press Camping
The Method: Steeping grounds in hot water, then pressing
Pros: Clean cup, excellent flavor control
Cons: Requires careful temperature management, breakable glass
Pour-Over Camping
The Method: Pouring hot water over grounds in a filter
Pros: Clean, bright flavors
Cons: Requires filters, single-cup brewing
Moka Pot
The Method: Steam pressure forces water through grounds
Pros: Strong, espresso-like coffee
Cons: Requires precise heat control, aluminum construction
Pairing Your Coffee with Camp Meals
Great camp coffee deserves equally great food pairings. The robust flavor of percolated coffee complements hearty camping meals perfectly.
Perfect Morning Pairings:
- Traditional campfire breakfast with eggs and bacon
- Pancakes with maple syrup
- Oatmeal with fresh berries
- Breakfast burritos with hot sauce
Coffee Enhancement Ideas:
- Add a pinch of cinnamon to grounds before brewing
- Stir in a small amount of cocoa powder
- Include cardamom pods for exotic flavor
- Try different regional coffee beans for variety
Safety Considerations and Best Practices
Fire Safety Protocols
Essential Safety Rules:
- Never leave a percolator unattended over fire
- Keep fire extinguishing materials nearby
- Establish clear areas around cooking fires
- Use proper heat-resistant gloves when handling
Equipment Safety
Preventing Burns and Injuries:
- Always assume metal parts are hot
- Use long-handled utensils for stirring and serving
- Keep a well-stocked first aid kit accessible
- Wear appropriate protective clothing around fires
Environmental Responsibility
Leave No Trace Principles:
- Dispose of coffee grounds properly (pack out or scatter widely)
- Use established fire rings when available
- Minimize impact on natural water sources
- Clean equipment away from streams and lakes
Troubleshooting Common Issues
Weak Coffee Problems
Symptoms: Pale color, lack of flavor, watery taste
Solutions:
- Increase coffee-to-water ratio
- Extend brewing time slightly
- Check for proper percolation action
- Verify grind size isn’t too coarse
Bitter Coffee Problems
Symptoms: Harsh taste, unpleasant aftertaste
Solutions:
- Reduce brewing time
- Lower heat during percolation
- Check grind size (may be too fine)
- Ensure clean equipment
Sediment Issues
Symptoms: Gritty texture, grounds in cup
Solutions:
- Use coarser grind
- Don’t overfill coffee basket
- Let coffee settle before pouring
- Check basket for damage
Temperature Control Problems
Symptoms: Inconsistent brewing, burnt taste
Solutions:
- Practice heat management techniques
- Use wind protection
- Consider alternative heat sources
- Monitor percolation visually
Building Your Camp Coffee Kit
Essential Items Checklist
Core Equipment:
- Quality percolator (appropriate size)
- Manual coffee grinder
- Measuring cups and spoons
- Heat-resistant gloves
- Long-handled spoon
Nice-to-Have Additions:
- Insulated serving mugs
- Coffee storage containers
- Portable scale for precision
- Backup brewing method
Budget Considerations
Entry-Level Setup ($30-50):
- Basic aluminum percolator
- Pre-ground coffee
- Simple measuring tools
Mid-Range Setup ($75-125):
- Stainless steel percolator
- Manual grinder
- Quality coffee beans
- Proper accessories
Premium Setup ($150+):
- High-end percolator
- Professional manual grinder
- Specialty coffee beans
- Complete accessory kit
Seasonal Coffee Considerations
Summer Camping Coffee
Hot Weather Adaptations:
- Brew stronger coffee for iced versions
- Consider cold brew concentrate
- Increase hydration with extra water
- Store coffee in shaded, cool areas
Winter Camping Coffee
Cold Weather Benefits:
- Hot coffee provides essential warmth
- Higher calorie needs support stronger brews
- Extended brewing time due to cold conditions
- Coffee helps with morning motivation
Winter-Specific Tips:
- Preheat equipment to prevent thermal shock
- Use extra insulation to maintain temperature
- Account for increased fuel consumption
- Plan for longer brewing times
Spring and Fall Coffee
Moderate Weather Advantages:
- Ideal conditions for learning technique
- Comfortable temperatures for extended brewing
- Perfect weather for outdoor coffee enjoyment
- Great seasons for family camping activities
The Social Aspect of Camp Coffee
Building Community Around Coffee
Camp coffee serves as more than just a caffeine delivery system – it creates community focal points and shared experiences. The ritual of brewing and sharing coffee brings campers together and creates lasting memories.
Community Building Benefits:
- Shared morning routine brings groups together
- Teaching brewing skills creates bonding opportunities
- Coffee sharing promotes camp hospitality
- Morning coffee time allows for day planning
Coffee Traditions and Rituals
Establishing Camp Coffee Traditions:
- Designate a “camp coffee master” who rotates daily
- Create special coffee blends for different trips
- Develop signature brewing techniques
- Document coffee adventures with photos and notes
Advanced Brewing Techniques
Temperature Profiling
Understanding Heat Curves:
- Initial rapid heating phase
- Transition to gentle percolation
- Maintenance of steady brewing temperature
- Immediate removal to prevent over-extraction
Timing Optimization
Precision Timing Methods:
- Use smartphone timers for consistency
- Track brewing times for different coffee types
- Adjust timing based on altitude and weather
- Document successful timing for future reference
Flavor Development
Enhancing Coffee Complexity:
- Experiment with different bean origins
- Try various roast levels
- Adjust grind size for flavor changes
- Combine different coffee varieties
Conclusion
Mastering the art of how to make coffee when you’re camping with a pot percolator transforms your outdoor experience from good to extraordinary. This traditional brewing method connects you to generations of outdoor enthusiasts while delivering consistently delicious results that rival any coffee shop.
The key to success lies in understanding the fundamentals: proper equipment selection, correct coffee-to-water ratios, appropriate grind size, and careful heat management. With practice, these techniques become second nature, allowing you to focus on enjoying your outdoor adventures rather than worrying about your morning caffeine fix.
Your Next Steps:
- Invest in quality equipment – Choose a percolator that matches your camping style and group size
- Practice at home – Master the technique in your backyard before heading into the wilderness
- Experiment with variables – Try different coffee beans, grind sizes, and brewing times to find your perfect cup
- Share the knowledge – Teach fellow campers and build community around great coffee
- Document your journey – Keep notes on successful brewing sessions for future reference
Remember that perfect camp coffee is about more than just technique – it’s about creating moments of comfort and connection in the great outdoors. Whether you’re watching the sunrise from your campsite or gathering around the fire with friends, that perfectly brewed cup of percolator coffee will enhance every outdoor memory you make.
Start your camp coffee journey today, and discover why generations of outdoor enthusiasts have relied on this time-tested brewing method. Your taste buds – and your fellow campers – will thank you for taking the time to master this essential outdoor skill.