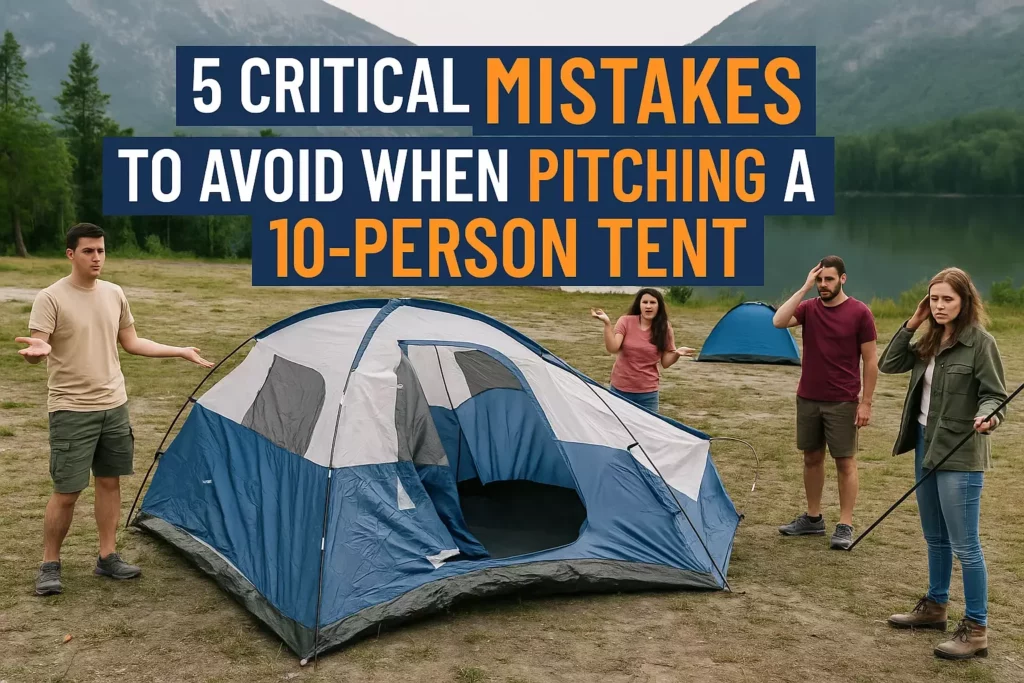
5 Critical Mistakes to Avoid When Pitching a 10-Person Tent
Picture this: You’ve planned the perfect family camping trip, complete with a spacious 10-person tent that promises comfort for everyone. But as storm clouds gather overhead and your tent collapses for the third time, you realize that bigger isn’t always better—especially when critical setup mistakes turn your dream shelter into a camping nightmare. Setting up a large tent requires precision, planning, and knowledge of common pitfalls that can make or break your outdoor adventure.
Disclosure: This post contains affiliate links. As an Amazon Associate, we earn from qualifying purchases, and at no extra cost to you.
Large tents offer incredible space and comfort for group camping, but they also present unique challenges that smaller tents simply don’t face. From wind resistance issues to drainage problems, the stakes are higher when you’re dealing with a shelter that needs to protect up to 10 people from the elements.
Key Takeaways
- Location selection is crucial – Poor site choice can lead to flooding, wind damage, and uncomfortable sleeping conditions
- Proper staking and guy-line tension prevents tent collapse and ensures structural integrity in adverse weather
- Weather preparation requires understanding how large tents behave differently than smaller ones in wind and rain
- Team coordination during setup prevents damage and ensures everyone knows their role
- Quality gear inspection before departure can prevent catastrophic failures in the wilderness
Mistake #1: Choosing the Wrong Campsite Location
The Foundation of Tent Success ?️
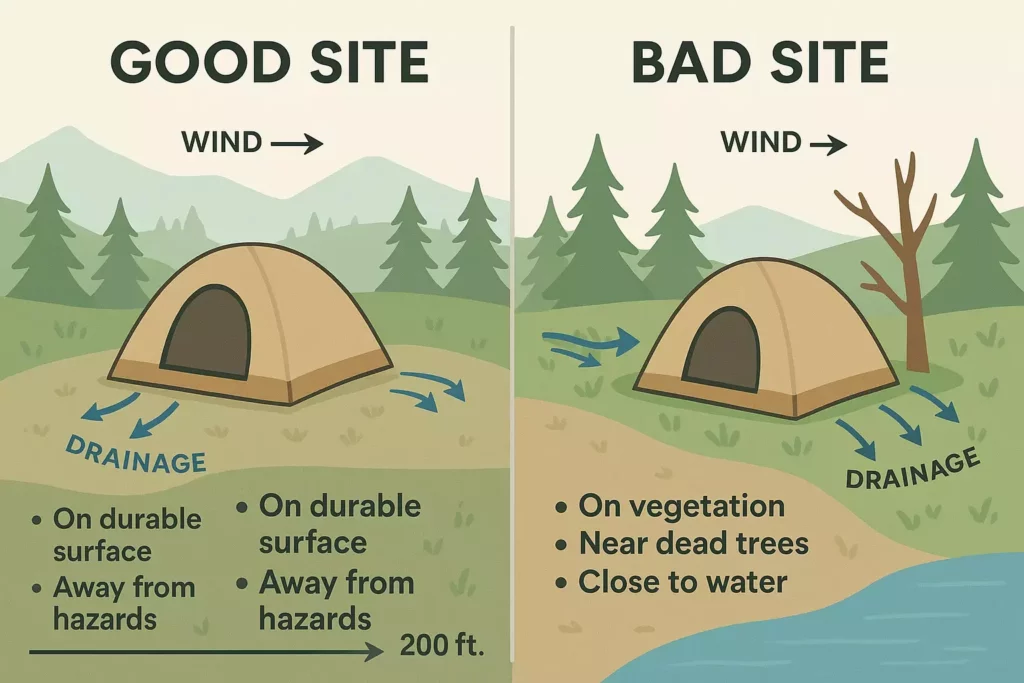
Site selection makes or breaks your camping experience, especially with a 10-person tent that covers significant ground. Many campers focus solely on finding a flat spot without considering the broader environmental factors that affect large shelters.
Common Location Errors
Ignoring natural drainage patterns tops the list of site selection mistakes. Large tents have substantial footprints, making them vulnerable to water pooling underneath during rain. Look for:
- Slight elevation compared to surrounding areas
- Natural water runoff patterns that direct moisture away from your site
- Soil composition that allows for proper drainage
Wind exposure assessment becomes critical with larger tents. A 10-person tent presents a massive surface area to wind forces. Avoid:
- Hilltops and ridgelines where wind speeds increase
- Valley bottoms where cold air settles
- Areas with no natural windbreaks
The Smart Site Selection Process
Walk the entire area before committing to a location. Spend 10-15 minutes examining:
- Ground composition – Avoid rocky, rooted, or extremely hard-packed soil
- Overhead hazards – Dead branches, unstable trees, or cliff faces
- Privacy and noise factors – Distance from high-traffic areas
- Access to amenities – Reasonable distance to water sources and facilities
Pro Tip: “The best campsite is one you can set up in the dark and wake up dry in the morning.” – Experienced camping guide
For families planning their first major camping adventure, understanding site selection becomes even more important. Check out our guide on camping with kids and family camping for additional considerations when choosing locations for large groups.
Mistake #2: Inadequate Ground Preparation and Staking
The Critical Foundation Phase
Ground preparation determines tent longevity and comfort throughout your entire camping trip. With a 10-person tent, shortcuts during this phase amplify problems exponentially.
Ground Clearing Essentials
Remove every obstacle within your tent footprint plus an additional two feet around the perimeter:
- Rocks and stones – Even small pebbles create pressure points that can damage tent floors
- Sticks and debris – Sharp objects puncture tent materials under body weight
- Vegetation – Thick grass or plants create uneven surfaces and moisture retention
Level assessment requires more attention with large tents. Use a basic level or smartphone app to check for:
- Slopes exceeding 3-5 degrees
- Depressions that could collect water
- High spots that create tent stress points
Staking Strategy for Large Tents
Stake placement follows specific patterns for 10-person tents:
| Stake Type | Quantity Needed | Placement Strategy |
|---|---|---|
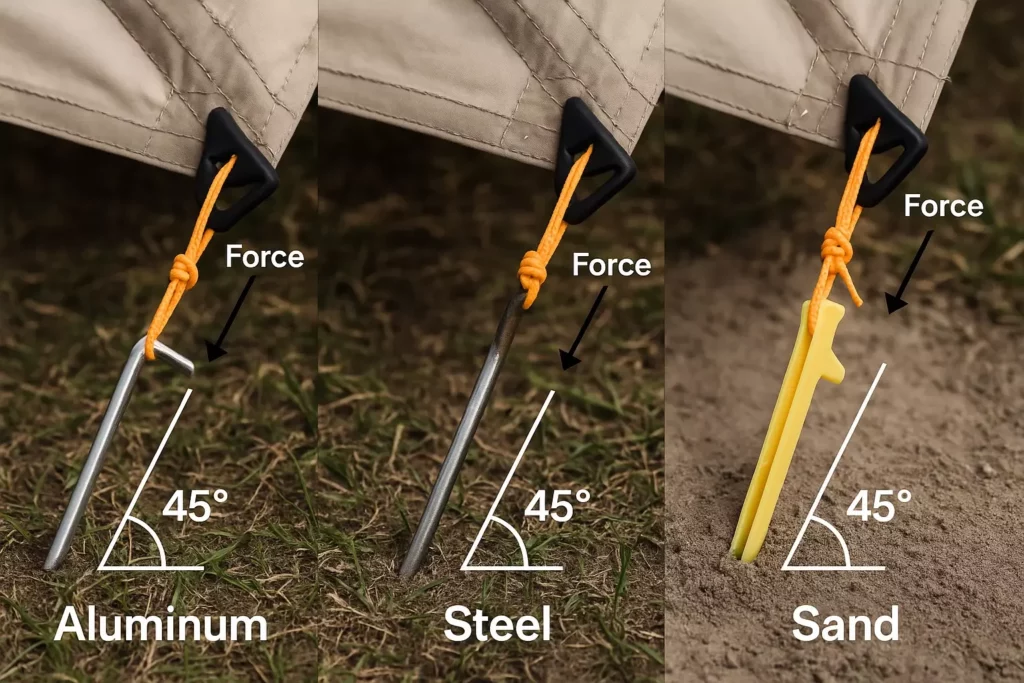
| Corner stakes | 4-6 | 45-degree angle, 6-8 inches deep |
| Guy-line stakes | 8-12 | Perpendicular to guy-lines, maximum distance |
| Vestibule stakes | 4-6 | Aligned with door panels |
Stake quality matters significantly with large tents. Standard tent stakes often fail under the increased tension. Invest in:
- Heavy-duty aluminum stakes for general use
- Steel stakes for hard or rocky ground
- Sand stakes for beach camping
- Snow stakes for winter conditions
Tension and Alignment Techniques
Proper tension prevents tent failure during weather events. Follow this sequence:
- Stake corners first with moderate tension
- Attach guy-lines before full tensioning
- Gradually increase tension across all points
- Check alignment to ensure even stress distribution
Having the right gear makes all the difference. Our comprehensive guide on building your first aid kit includes tools that can help with ground preparation and emergency tent repairs.
Mistake #3: Ignoring Weather Conditions and Forecasts
Weather Awareness for Large Shelters
Large tents behave differently in weather compared to smaller shelters. The increased surface area and height create unique challenges that require specific preparation strategies.
Wind Considerations
Wind load calculations become critical with 10-person tents:
- Surface area exposure can exceed 200 square feet
- Height profiles create more wind resistance
- Guy-line systems must handle significantly more force
Wind speed thresholds for large tent safety:
- 15-20 mph: Increased vigilance required
- 25-30 mph: Consider additional reinforcement
- 35+ mph: Evaluate shelter alternatives
Rain and Water Management
Water management systems need enhancement for large tents:
Rainfly positioning requires precise adjustment:
- Ensure complete coverage with 6-inch minimum overhang
- Create adequate ventilation gaps to prevent condensation
- Secure all attachment points to prevent water intrusion
Drainage planning around large tents:
- Dig shallow trenches around the tent perimeter if permitted
- Use tarps to create water diversion systems
- Position gear storage to avoid water collection areas
Temperature Regulation Challenges
Large tents present unique temperature control issues:
Heat retention in summer conditions:
- Increased air volume requires more energy to cool
- Multiple occupants generate significant heat
- Ventilation becomes critical for comfort
Cold weather considerations:
- Larger spaces are harder to warm
- More condensation potential from multiple occupants
- Increased heat loss through larger surface area
For cold weather camping, proper clothing selection becomes essential. Review our guide on cool weather clothes for camping to ensure everyone stays comfortable.
Mistake #4: Poor Team Coordination During Setup
The Importance of Organized Setup
Coordination failures lead to damaged equipment and frustrated campers. With 10-person tents requiring multiple people for proper setup, clear communication and defined roles prevent chaos and costly mistakes.
Pre-Setup Planning
Assign specific roles before beginning the setup process:
Team Leader (1 person):
- Directs overall setup sequence
- Makes final decisions on placement and adjustments
- Monitors weather conditions
Corner Team (2-3 people):
- Handles tent body positioning
- Manages stake placement
- Ensures proper alignment
Rainfly Team (2-3 people):
- Attaches rainfly after tent body is secure
- Manages guy-line setup
- Adjusts tension and positioning
Support Team (remaining members):
- Organizes gear and supplies
- Prepares sleeping areas
- Handles camp setup tasks
Communication Protocols
Clear communication prevents setup disasters:
- Use specific terminology – “Your left” vs. “tent left”
- Confirm instructions before taking action
- Stop work immediately if someone calls “hold”
- Check progress regularly with all team members
Common Coordination Failures
Simultaneous pulling from multiple directions can damage tent poles and fabric. Establish a sequence:
- Position tent body completely before any tensioning
- Insert all poles before raising the tent
- Attach rainfly only after tent body is secure
- Apply tension gradually and evenly
Equipment organization prevents lost or damaged gear:
- Designate specific areas for stakes, guy-lines, and tools
- Count all components before and after setup
- Assign responsibility for each equipment category
For families new to group camping, our article on family camping tip activities for kids provides strategies for keeping younger family members engaged during setup.
Mistake #5: Insufficient Gear Quality and Preparation
The Equipment Foundation
Quality gear makes the difference between camping success and disaster, especially with large tents that face increased stress and environmental challenges.
Essential Quality Indicators
Tent construction quality affects performance and durability:
Fabric specifications to evaluate:
- Denier rating – Higher numbers indicate stronger fabric
- Waterproof rating – Minimum 3,000mm for reliable protection
- UV resistance – Essential for extended outdoor exposure
Pole and hardware quality:
- Aluminum poles over fiberglass for strength and weight
- Reinforced connection points at high-stress areas
- Quality zippers with storm flaps and dual pulls
Pre-Trip Inspection Protocol
Thorough gear inspection prevents field failures:
Tent body examination:
- Check all seams for loose threads or separation
- Inspect fabric for tears, holes, or weak spots
- Test all zippers under load conditions
- Verify pole connections and locking mechanisms
Rainfly and guy-line assessment:
- Examine waterproof coating for cracks or peeling
- Test guy-line adjustment mechanisms
- Check all attachment points for wear or damage
- Verify stake compatibility with your camping terrain
Backup and Repair Preparation
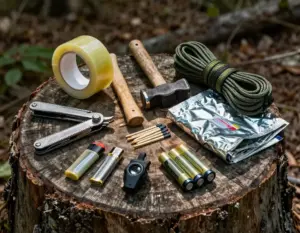
Repair kit essentials for large tent camping:
| Item | Purpose | Quantity |
|---|---|---|
| Tent repair tape | Fabric tears and holes | 1 roll |
| Seam sealer | Waterproofing maintenance | 1 tube |
| Replacement stakes | Bent or lost stakes | 6-8 extras |
| Shock cord | Pole repair | 10 feet |
| Duct tape | Emergency repairs | 1 roll |
Backup shelter options provide security:
- Lightweight tarp for emergency coverage
- Smaller backup tent for critical situations
- Knowledge of local emergency shelter options
Maintenance and Storage
Proper maintenance extends tent life:
Post-trip care:
- Clean and dry completely before storage
- Store in breathable bags, not plastic
- Inspect and repair minor damage immediately
- Reapply waterproofing treatments annually
Storage environment:
- Cool, dry location away from direct sunlight
- Avoid compression storage for extended periods
- Check stored gear quarterly for pest damage
- Maintain inventory of replacement parts
Understanding how to properly pack and organize your gear makes a significant difference in setup success. Our comprehensive guide on how to pack your backpack for camping provides strategies that apply to large tent camping as well.
Advanced Tips for 10-Person Tent Success

Seasonal Considerations
Different seasons require adapted strategies for large tent camping:
Summer setup priorities:
- Maximize ventilation to prevent condensation
- Position for morning shade when possible
- Consider elevated platforms for air circulation
- Plan for increased internal temperatures
Winter camping adaptations:
- Focus on wind protection over ventilation
- Use snow walls for additional insulation
- Plan for condensation management
- Consider internal heating safety
Group Dynamics and Space Management
Internal organization becomes crucial with 10 people:
Sleeping area allocation:
- Assign specific zones to prevent conflicts
- Plan for different sleep schedules
- Designate quiet zones and social areas
- Consider privacy needs and solutions
Gear storage systems:
- Create designated areas for personal items
- Establish common gear zones
- Plan for wet gear drying
- Organize emergency equipment access
For larger groups, meal planning and preparation become more complex. Our guide on campfire cooking a typical morning meal provides strategies for feeding large groups efficiently.
Emergency Preparedness
Large group camping requires enhanced emergency planning:
Communication systems:
- Establish check-in procedures
- Plan for emergency evacuation
- Designate emergency coordinators
- Prepare backup communication methods
Medical considerations:
- Scale first aid supplies for group size
- Plan for medical emergency evacuation
- Consider special medical needs
- Establish emergency contact procedures
Weather emergency protocols:
- Identify emergency shelter locations
- Plan for tent failure scenarios
- Establish severe weather procedures
- Prepare backup shelter options
Conclusion
Successfully pitching a 10-person tent requires attention to detail, quality equipment, and coordinated teamwork. By avoiding these five critical mistakes—poor site selection, inadequate ground preparation, ignoring weather conditions, poor team coordination, and insufficient gear quality—you’ll create a comfortable and safe shelter for your entire group.
Remember that preparation is everything. Take time before your trip to inspect equipment, assign roles, and practice setup procedures. Consider starting with smaller group camping experiences to build skills and confidence before tackling the challenges of a 10-person tent.
Your next steps should include:
- Practice setup in your backyard or local park before your camping trip
- Create a detailed checklist customized for your specific tent model and group needs
- Invest in quality stakes and guy-lines appropriate for your camping conditions
- Develop emergency protocols with all group members
- Plan backup shelter options for worst-case scenarios
The investment in proper setup techniques and quality equipment pays dividends in comfort, safety, and memorable camping experiences. Take the time to master these fundamentals, and your large group camping adventures will be remembered for all the right reasons.
For those just starting their camping journey, our comprehensive guide on ozark 8-person tent and first-time camp setup provides additional insights that apply to larger tent setups as well.